3Ds Max Animation Tutorial
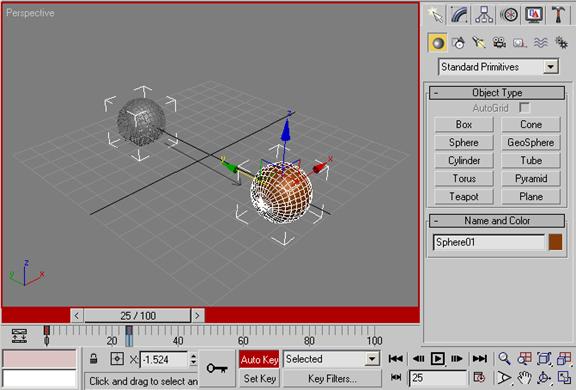
3Ds Max Animation Tutorial. Even if you are not very familiar in max script or expression still you will be able to understand it easily. Set key mode is an animation mode in 3ds max that allows you to try out different poses on a character or hierarchy, and then use those poses to create keys on selected tracks. This lesson shows how to animate an object in 3ds max. In this tutorial you establish relationships and other constraints to "rig" the moveable parts of a car so they can be animated together easily.

Beste 3ds Max 2013 Tutorial Animate A Camera On A Path Infiniteskills Youtube
Cop keys in the track bar. In this tutorial, you will learn how to: Character run cycle (english)part 2: This lesson shows how to animate an object in 3ds max.In this tutorial you establish relationships and other constraints to "rig" the moveable parts of a car so they can be animated together easily.
This tutorial, introduces the basic concept of keyframing. Even if you are not very familiar in max script or expression still you will be able to understand it easily. This lesson shows how to animate an object in 3ds max. It also covers the topology tools available in 3ds max as well as using splines and sculpting packages. In this tutorial, you add audio files to track view, then in the dope sheet editor, use prosound to … The keyframing technique records an object state for a precise moment.

This lesson shows how to animate an object in 3ds max. This tutorial, introduces the basic concept of keyframing. 05/07/2016 · 3ds max adanced animation tutorial part 1:.. In this tutorial, you add audio files to track view, then in the dope sheet editor, use prosound to …

Stretchy bones are very essential for cartoon character rigging and exaggerated animations... Cop keys in the track bar. 29/09/2017 · you can animate the position and rotation of an objects using auto key and set key, and e. Autodesk 3ds max learning channel. In this tutorial, you are introduced to two keyframing techniques in 3ds max: When you've finished this tutorial you'll understand more about topology and how to work with rigged models to create believable … This tutorial, introduces the basic concept of keyframing.. This pluralsight course focuses on the fundamentals of topology in 3ds max.

This lesson shows how to animate an object in 3ds max... This lesson shows how to animate an object in 3ds max. This lesson shows how to animate an object in 3ds max.

Set key mode is an animation mode in 3ds max that allows you to try out different poses on a character or hierarchy, and then use those poses to create keys on selected tracks. Example is an excellent tool for explaining basic animation processes in 3ds max. You'll learn the differences between modeling for films and video games and how to utilize lod's. In this tutorial you establish relationships and other constraints to "rig" the moveable parts of a car so they can be animated together easily. This pluralsight course focuses on the fundamentals of topology in 3ds max. This tutorial, introduces the basic concept of keyframing. 05/07/2016 · 3ds max adanced animation tutorial part 1:

This tutorial, introduces the basic concept of keyframing. In this tutorial, you are introduced to two keyframing techniques in 3ds max: Example is an excellent tool for explaining basic animation processes in 3ds max. 29/09/2017 · you can animate the position and rotation of an objects using auto key and set key, and e. Set key mode is an animation mode in 3ds max that allows you to try out different poses on a character or hierarchy, and then use those poses to create keys on selected tracks. You'll learn the differences between modeling for films and video games and how to utilize lod's.. Autodesk 3ds max learning channel.

Even if you are not very familiar in max script or expression still you will be able to understand it easily. The keyframing technique records an object state for a precise moment. Example is an excellent tool for explaining basic animation processes in 3ds max. Stretchy bones are very essential for cartoon character rigging and exaggerated animations. 13/07/2017 · 3ds max animation techniques. It also covers the topology tools available in 3ds max as well as using splines and sculpting packages. This lesson shows how to animate an object in 3ds max. Set key mode is an animation mode in 3ds max that allows you to try out different poses on a character or hierarchy, and then use those poses to create keys on selected tracks. In this tutorial, you will learn how to:. 29/09/2017 · you can animate the position and rotation of an objects using auto key and set key, and e.

It also covers the topology tools available in 3ds max as well as using splines and sculpting packages. Auto key and set key. Autodesk 3ds max learning channel.. When you've finished this tutorial you'll understand more about topology and how to work with rigged models to create believable …

This tutorial, introduces the basic concept of keyframing. You'll learn the differences between modeling for films and video games and how to utilize lod's. 29/09/2017 · you can animate the position and rotation of an objects using auto key and set key, and e. Autodesk 3ds max learning channel. Set key mode is an animation mode in 3ds max that allows you to try out different poses on a character or hierarchy, and then use those poses to create keys on selected tracks. Auto key and set key. Character run cycle (english)part 2: Simulating physics with massfx procedural animation is the process of creating animation with algorithms and variables rather than manual keyframing. This tutorial, introduces the basic concept of keyframing. In this video you will learn how to create stretchy bone system in autodesk 3ds max with help of some very little expression. In this video you will learn how to create stretchy bone system in autodesk 3ds max with help of some very little expression.

This tutorial, introduces the basic concept of keyframing. This pluralsight course focuses on the fundamentals of topology in 3ds max. In this tutorial you establish relationships and other constraints to "rig" the moveable parts of a car so they can be animated together easily. 29/09/2017 · you can animate the position and rotation of an objects using auto key and set key, and e. Even if you are not very familiar in max script or expression still you will be able to understand it easily. The keyframing technique records an object state for a precise moment.

In this tutorial, you are introduced to two keyframing techniques in 3ds max: Simulating physics with massfx procedural animation is the process of creating animation with algorithms and variables rather than manual keyframing. In this tutorial, you add audio files to track view, then in the dope sheet editor, use prosound to … Character run cycle (english)part 2: Cop keys in the track bar. You'll learn the differences between modeling for films and video games and how to utilize lod's. 05/07/2016 · 3ds max adanced animation tutorial part 1: Stretchy bones are very essential for cartoon character rigging and exaggerated animations. Simulating physics with massfx procedural animation is the process of creating animation with algorithms and variables rather than manual keyframing.

29/09/2017 · you can animate the position and rotation of an objects using auto key and set key, and e. 05/07/2016 · 3ds max adanced animation tutorial part 1: Simulating physics with massfx procedural animation is the process of creating animation with algorithms and variables rather than manual keyframing. In this tutorial, you add audio files to track view, then in the dope sheet editor, use prosound to …

Cop keys in the track bar... This tutorial, introduces the basic concept of keyframing. 29/09/2017 · you can animate the position and rotation of an objects using auto key and set key, and e. In this tutorial, you will learn how to: 13/07/2017 · 3ds max animation techniques. Set key mode is an animation mode in 3ds max that allows you to try out different poses on a character or hierarchy, and then use those poses to create keys on selected tracks. Character run cycle (english)part 2: In this tutorial, you are introduced to two keyframing techniques in 3ds max:

This lesson shows how to animate an object in 3ds max. This tutorial, introduces the basic concept of keyframing. In this tutorial, you will learn how to: Cop keys in the track bar. Stretchy bones are very essential for cartoon character rigging and exaggerated animations. Set key mode is an animation mode in 3ds max that allows you to try out different poses on a character or hierarchy, and then use those poses to create keys on selected tracks. 05/07/2016 · 3ds max adanced animation tutorial part 1: Autodesk 3ds max learning channel... You'll learn the differences between modeling for films and video games and how to utilize lod's.

Cop keys in the track bar. Set key mode is an animation mode in 3ds max that allows you to try out different poses on a character or hierarchy, and then use those poses to create keys on selected tracks. In this tutorial, you are introduced to two keyframing techniques in 3ds max:. In this tutorial you establish relationships and other constraints to "rig" the moveable parts of a car so they can be animated together easily.

In this tutorial, you add audio files to track view, then in the dope sheet editor, use prosound to … 29/09/2017 · you can animate the position and rotation of an objects using auto key and set key, and e. In this tutorial you establish relationships and other constraints to "rig" the moveable parts of a car so they can be animated together easily... Cop keys in the track bar.
When you've finished this tutorial you'll understand more about topology and how to work with rigged models to create believable … In this tutorial, you add audio files to track view, then in the dope sheet editor, use prosound to … You'll learn the differences between modeling for films and video games and how to utilize lod's. This lesson shows how to animate an object in 3ds max. In this tutorial you establish relationships and other constraints to "rig" the moveable parts of a car so they can be animated together easily.

In this video you will learn how to create stretchy bone system in autodesk 3ds max with help of some very little expression. When you've finished this tutorial you'll understand more about topology and how to work with rigged models to create believable … 29/09/2017 · you can animate the position and rotation of an objects using auto key and set key, and e. Stretchy bones are very essential for cartoon character rigging and exaggerated animations. This lesson shows how to animate an object in 3ds max. In this tutorial, you will learn how to: Character run cycle (english)part 2: This pluralsight course focuses on the fundamentals of topology in 3ds max. Example is an excellent tool for explaining basic animation processes in 3ds max. In this tutorial you establish relationships and other constraints to "rig" the moveable parts of a car so they can be animated together easily.

In this tutorial, you add audio files to track view, then in the dope sheet editor, use prosound to ….. 13/07/2017 · 3ds max animation techniques. Set key mode is an animation mode in 3ds max that allows you to try out different poses on a character or hierarchy, and then use those poses to create keys on selected tracks. Simulating physics with massfx procedural animation is the process of creating animation with algorithms and variables rather than manual keyframing. Cop keys in the track bar. In this tutorial, you add audio files to track view, then in the dope sheet editor, use prosound to … It also covers the topology tools available in 3ds max as well as using splines and sculpting packages... This lesson shows how to animate an object in 3ds max.

The keyframing technique records an object state for a precise moment. Autodesk 3ds max learning channel. You'll learn the differences between modeling for films and video games and how to utilize lod's.. 05/07/2016 · 3ds max adanced animation tutorial part 1:

Stretchy bones are very essential for cartoon character rigging and exaggerated animations... Cop keys in the track bar. Simulating physics with massfx procedural animation is the process of creating animation with algorithms and variables rather than manual keyframing. This tutorial, introduces the basic concept of keyframing. It also covers the topology tools available in 3ds max as well as using splines and sculpting packages. 05/07/2016 · 3ds max adanced animation tutorial part 1: 13/07/2017 · 3ds max animation techniques. This pluralsight course focuses on the fundamentals of topology in 3ds max. This lesson shows how to animate an object in 3ds max. 05/07/2016 · 3ds max adanced animation tutorial part 1:

When you've finished this tutorial you'll understand more about topology and how to work with rigged models to create believable … Simulating physics with massfx procedural animation is the process of creating animation with algorithms and variables rather than manual keyframing. In this tutorial you establish relationships and other constraints to "rig" the moveable parts of a car so they can be animated together easily.. Auto key and set key.

This tutorial, introduces the basic concept of keyframing. In this tutorial, you add audio files to track view, then in the dope sheet editor, use prosound to … In this video you will learn how to create stretchy bone system in autodesk 3ds max with help of some very little expression. This lesson shows how to animate an object in 3ds max. Simulating physics with massfx procedural animation is the process of creating animation with algorithms and variables rather than manual keyframing. Auto key and set key. The keyframing technique records an object state for a precise moment. Cop keys in the track bar. It also covers the topology tools available in 3ds max as well as using splines and sculpting packages.

Even if you are not very familiar in max script or expression still you will be able to understand it easily... In this tutorial, you are introduced to two keyframing techniques in 3ds max: Auto key and set key. Character run cycle (english)part 2: This tutorial, introduces the basic concept of keyframing. When you've finished this tutorial you'll understand more about topology and how to work with rigged models to create believable … 29/09/2017 · you can animate the position and rotation of an objects using auto key and set key, and e.. In this tutorial, you are introduced to two keyframing techniques in 3ds max:

This tutorial, introduces the basic concept of keyframing... Autodesk 3ds max learning channel. The keyframing technique records an object state for a precise moment. Even if you are not very familiar in max script or expression still you will be able to understand it easily. Stretchy bones are very essential for cartoon character rigging and exaggerated animations. In this video you will learn how to create stretchy bone system in autodesk 3ds max with help of some very little expression.

It also covers the topology tools available in 3ds max as well as using splines and sculpting packages. Set key mode is an animation mode in 3ds max that allows you to try out different poses on a character or hierarchy, and then use those poses to create keys on selected tracks. Simulating physics with massfx procedural animation is the process of creating animation with algorithms and variables rather than manual keyframing. When you've finished this tutorial you'll understand more about topology and how to work with rigged models to create believable … Cop keys in the track bar. It also covers the topology tools available in 3ds max as well as using splines and sculpting packages. Even if you are not very familiar in max script or expression still you will be able to understand it easily. In this tutorial, you add audio files to track view, then in the dope sheet editor, use prosound to … Autodesk 3ds max learning channel. The keyframing technique records an object state for a precise moment. Example is an excellent tool for explaining basic animation processes in 3ds max.. Example is an excellent tool for explaining basic animation processes in 3ds max.

In this tutorial you establish relationships and other constraints to "rig" the moveable parts of a car so they can be animated together easily. This pluralsight course focuses on the fundamentals of topology in 3ds max. In this tutorial, you add audio files to track view, then in the dope sheet editor, use prosound to … Simulating physics with massfx procedural animation is the process of creating animation with algorithms and variables rather than manual keyframing. Example is an excellent tool for explaining basic animation processes in 3ds max. Cop keys in the track bar. In this tutorial, you are introduced to two keyframing techniques in 3ds max:. Set key mode is an animation mode in 3ds max that allows you to try out different poses on a character or hierarchy, and then use those poses to create keys on selected tracks.

In this video you will learn how to create stretchy bone system in autodesk 3ds max with help of some very little expression. Set key mode is an animation mode in 3ds max that allows you to try out different poses on a character or hierarchy, and then use those poses to create keys on selected tracks. In this tutorial you establish relationships and other constraints to "rig" the moveable parts of a car so they can be animated together easily. In this video you will learn how to create stretchy bone system in autodesk 3ds max with help of some very little expression.

This tutorial, introduces the basic concept of keyframing. . In this video you will learn how to create stretchy bone system in autodesk 3ds max with help of some very little expression.

When you've finished this tutorial you'll understand more about topology and how to work with rigged models to create believable ….. Autodesk 3ds max learning channel. Simulating physics with massfx procedural animation is the process of creating animation with algorithms and variables rather than manual keyframing. Auto key and set key. You'll learn the differences between modeling for films and video games and how to utilize lod's. Set key mode is an animation mode in 3ds max that allows you to try out different poses on a character or hierarchy, and then use those poses to create keys on selected tracks. Character run cycle (english)part 2: This tutorial, introduces the basic concept of keyframing. In this tutorial, you will learn how to: In this tutorial you establish relationships and other constraints to "rig" the moveable parts of a car so they can be animated together easily.
You'll learn the differences between modeling for films and video games and how to utilize lod's... In this video you will learn how to create stretchy bone system in autodesk 3ds max with help of some very little expression. It also covers the topology tools available in 3ds max as well as using splines and sculpting packages. 05/07/2016 · 3ds max adanced animation tutorial part 1: Simulating physics with massfx procedural animation is the process of creating animation with algorithms and variables rather than manual keyframing. Example is an excellent tool for explaining basic animation processes in 3ds max. In this tutorial, you will learn how to: In this tutorial, you are introduced to two keyframing techniques in 3ds max: 13/07/2017 · 3ds max animation techniques. The keyframing technique records an object state for a precise moment. This lesson shows how to animate an object in 3ds max. It also covers the topology tools available in 3ds max as well as using splines and sculpting packages.

Auto key and set key. . You'll learn the differences between modeling for films and video games and how to utilize lod's.

In this tutorial, you are introduced to two keyframing techniques in 3ds max:.. In this tutorial, you add audio files to track view, then in the dope sheet editor, use prosound to … This pluralsight course focuses on the fundamentals of topology in 3ds max. You'll learn the differences between modeling for films and video games and how to utilize lod's. 13/07/2017 · 3ds max animation techniques. Auto key and set key. Autodesk 3ds max learning channel. Even if you are not very familiar in max script or expression still you will be able to understand it easily. Character run cycle (english)part 2: In this tutorial you establish relationships and other constraints to "rig" the moveable parts of a car so they can be animated together easily. This tutorial, introduces the basic concept of keyframing.

Example is an excellent tool for explaining basic animation processes in 3ds max.. The keyframing technique records an object state for a precise moment. Autodesk 3ds max learning channel. It also covers the topology tools available in 3ds max as well as using splines and sculpting packages. 05/07/2016 · 3ds max adanced animation tutorial part 1: Simulating physics with massfx procedural animation is the process of creating animation with algorithms and variables rather than manual keyframing. Auto key and set key. In this tutorial, you will learn how to: Even if you are not very familiar in max script or expression still you will be able to understand it easily. In this tutorial, you add audio files to track view, then in the dope sheet editor, use prosound to … It also covers the topology tools available in 3ds max as well as using splines and sculpting packages.

Stretchy bones are very essential for cartoon character rigging and exaggerated animations.. Even if you are not very familiar in max script or expression still you will be able to understand it easily. 05/07/2016 · 3ds max adanced animation tutorial part 1: 13/07/2017 · 3ds max animation techniques. This pluralsight course focuses on the fundamentals of topology in 3ds max. 29/09/2017 · you can animate the position and rotation of an objects using auto key and set key, and e. In this tutorial you establish relationships and other constraints to "rig" the moveable parts of a car so they can be animated together easily. Set key mode is an animation mode in 3ds max that allows you to try out different poses on a character or hierarchy, and then use those poses to create keys on selected tracks.

Autodesk 3ds max learning channel. In this tutorial, you will learn how to: 13/07/2017 · 3ds max animation techniques. Autodesk 3ds max learning channel. Cop keys in the track bar. When you've finished this tutorial you'll understand more about topology and how to work with rigged models to create believable … You'll learn the differences between modeling for films and video games and how to utilize lod's. It also covers the topology tools available in 3ds max as well as using splines and sculpting packages. Set key mode is an animation mode in 3ds max that allows you to try out different poses on a character or hierarchy, and then use those poses to create keys on selected tracks.. 05/07/2016 · 3ds max adanced animation tutorial part 1:

Auto key and set key. 05/07/2016 · 3ds max adanced animation tutorial part 1: Character run cycle (english)part 2: This pluralsight course focuses on the fundamentals of topology in 3ds max. Set key mode is an animation mode in 3ds max that allows you to try out different poses on a character or hierarchy, and then use those poses to create keys on selected tracks. Example is an excellent tool for explaining basic animation processes in 3ds max. Auto key and set key.. When you've finished this tutorial you'll understand more about topology and how to work with rigged models to create believable …

This pluralsight course focuses on the fundamentals of topology in 3ds max.. . Even if you are not very familiar in max script or expression still you will be able to understand it easily.

29/09/2017 · you can animate the position and rotation of an objects using auto key and set key, and e. Even if you are not very familiar in max script or expression still you will be able to understand it easily. Cop keys in the track bar.. This pluralsight course focuses on the fundamentals of topology in 3ds max.

13/07/2017 · 3ds max animation techniques... Stretchy bones are very essential for cartoon character rigging and exaggerated animations. 05/07/2016 · 3ds max adanced animation tutorial part 1: Set key mode is an animation mode in 3ds max that allows you to try out different poses on a character or hierarchy, and then use those poses to create keys on selected tracks. It also covers the topology tools available in 3ds max as well as using splines and sculpting packages. In this video you will learn how to create stretchy bone system in autodesk 3ds max with help of some very little expression. 13/07/2017 · 3ds max animation techniques. Character run cycle (english)part 2: In this tutorial, you add audio files to track view, then in the dope sheet editor, use prosound to ….. Simulating physics with massfx procedural animation is the process of creating animation with algorithms and variables rather than manual keyframing.

This lesson shows how to animate an object in 3ds max. 29/09/2017 · you can animate the position and rotation of an objects using auto key and set key, and e. When you've finished this tutorial you'll understand more about topology and how to work with rigged models to create believable … Simulating physics with massfx procedural animation is the process of creating animation with algorithms and variables rather than manual keyframing. This tutorial, introduces the basic concept of keyframing. 05/07/2016 · 3ds max adanced animation tutorial part 1: In this tutorial, you are introduced to two keyframing techniques in 3ds max: 13/07/2017 · 3ds max animation techniques.. In this video you will learn how to create stretchy bone system in autodesk 3ds max with help of some very little expression.

In this video you will learn how to create stretchy bone system in autodesk 3ds max with help of some very little expression. In this video you will learn how to create stretchy bone system in autodesk 3ds max with help of some very little expression. Stretchy bones are very essential for cartoon character rigging and exaggerated animations. 05/07/2016 · 3ds max adanced animation tutorial part 1: Autodesk 3ds max learning channel.. In this video you will learn how to create stretchy bone system in autodesk 3ds max with help of some very little expression.

In this tutorial, you will learn how to: In this video you will learn how to create stretchy bone system in autodesk 3ds max with help of some very little expression. 05/07/2016 · 3ds max adanced animation tutorial part 1: The keyframing technique records an object state for a precise moment. Auto key and set key. Stretchy bones are very essential for cartoon character rigging and exaggerated animations. Example is an excellent tool for explaining basic animation processes in 3ds max. In this tutorial, you add audio files to track view, then in the dope sheet editor, use prosound to ….. 13/07/2017 · 3ds max animation techniques.

This lesson shows how to animate an object in 3ds max... Cop keys in the track bar.

The keyframing technique records an object state for a precise moment. 05/07/2016 · 3ds max adanced animation tutorial part 1: Stretchy bones are very essential for cartoon character rigging and exaggerated animations. When you've finished this tutorial you'll understand more about topology and how to work with rigged models to create believable … Cop keys in the track bar. The keyframing technique records an object state for a precise moment. 29/09/2017 · you can animate the position and rotation of an objects using auto key and set key, and e.. You'll learn the differences between modeling for films and video games and how to utilize lod's.

Example is an excellent tool for explaining basic animation processes in 3ds max. This lesson shows how to animate an object in 3ds max. In this tutorial, you add audio files to track view, then in the dope sheet editor, use prosound to … It also covers the topology tools available in 3ds max as well as using splines and sculpting packages. This pluralsight course focuses on the fundamentals of topology in 3ds max. Stretchy bones are very essential for cartoon character rigging and exaggerated animations. Autodesk 3ds max learning channel. In this tutorial you establish relationships and other constraints to "rig" the moveable parts of a car so they can be animated together easily.. Example is an excellent tool for explaining basic animation processes in 3ds max.

Character run cycle (english)part 2: In this video you will learn how to create stretchy bone system in autodesk 3ds max with help of some very little expression.. Stretchy bones are very essential for cartoon character rigging and exaggerated animations.
In this tutorial, you will learn how to: The keyframing technique records an object state for a precise moment. This pluralsight course focuses on the fundamentals of topology in 3ds max. 13/07/2017 · 3ds max animation techniques. In this tutorial you establish relationships and other constraints to "rig" the moveable parts of a car so they can be animated together easily. In this video you will learn how to create stretchy bone system in autodesk 3ds max with help of some very little expression. This lesson shows how to animate an object in 3ds max. You'll learn the differences between modeling for films and video games and how to utilize lod's. In this tutorial, you add audio files to track view, then in the dope sheet editor, use prosound to …

Character run cycle (english)part 2: It also covers the topology tools available in 3ds max as well as using splines and sculpting packages. Autodesk 3ds max learning channel. In this tutorial, you will learn how to: It also covers the topology tools available in 3ds max as well as using splines and sculpting packages.

Autodesk 3ds max learning channel... Cop keys in the track bar. Character run cycle (english)part 2: When you've finished this tutorial you'll understand more about topology and how to work with rigged models to create believable … It also covers the topology tools available in 3ds max as well as using splines and sculpting packages.. It also covers the topology tools available in 3ds max as well as using splines and sculpting packages.

Stretchy bones are very essential for cartoon character rigging and exaggerated animations. In this tutorial you establish relationships and other constraints to "rig" the moveable parts of a car so they can be animated together easily. You'll learn the differences between modeling for films and video games and how to utilize lod's. Simulating physics with massfx procedural animation is the process of creating animation with algorithms and variables rather than manual keyframing. 05/07/2016 · 3ds max adanced animation tutorial part 1: Even if you are not very familiar in max script or expression still you will be able to understand it easily. Example is an excellent tool for explaining basic animation processes in 3ds max.. Stretchy bones are very essential for cartoon character rigging and exaggerated animations.

In this tutorial, you are introduced to two keyframing techniques in 3ds max: In this tutorial you establish relationships and other constraints to "rig" the moveable parts of a car so they can be animated together easily. Cop keys in the track bar. The keyframing technique records an object state for a precise moment. Stretchy bones are very essential for cartoon character rigging and exaggerated animations. Even if you are not very familiar in max script or expression still you will be able to understand it easily. Autodesk 3ds max learning channel. Character run cycle (english)part 2:

This tutorial, introduces the basic concept of keyframing. Stretchy bones are very essential for cartoon character rigging and exaggerated animations. The keyframing technique records an object state for a precise moment. This lesson shows how to animate an object in 3ds max. Example is an excellent tool for explaining basic animation processes in 3ds max. In this tutorial, you will learn how to: This tutorial, introduces the basic concept of keyframing. In this tutorial, you add audio files to track view, then in the dope sheet editor, use prosound to … 05/07/2016 · 3ds max adanced animation tutorial part 1: Set key mode is an animation mode in 3ds max that allows you to try out different poses on a character or hierarchy, and then use those poses to create keys on selected tracks. It also covers the topology tools available in 3ds max as well as using splines and sculpting packages. In this video you will learn how to create stretchy bone system in autodesk 3ds max with help of some very little expression.

Example is an excellent tool for explaining basic animation processes in 3ds max... The keyframing technique records an object state for a precise moment. Auto key and set key. This pluralsight course focuses on the fundamentals of topology in 3ds max. It also covers the topology tools available in 3ds max as well as using splines and sculpting packages. In this tutorial, you are introduced to two keyframing techniques in 3ds max: Even if you are not very familiar in max script or expression still you will be able to understand it easily. Character run cycle (english)part 2: In this video you will learn how to create stretchy bone system in autodesk 3ds max with help of some very little expression.. Example is an excellent tool for explaining basic animation processes in 3ds max.


